Rate Limiting Visualizer
An interactive visualization of rate limiting algorithms in action. Watch how Token Bucket, Fixed Window, Sliding Window, and Leaky Bucket handle traffic in real-time.
Demo: rate-limit.vercel.app
Source: github.com/brianhliou/rate-limit
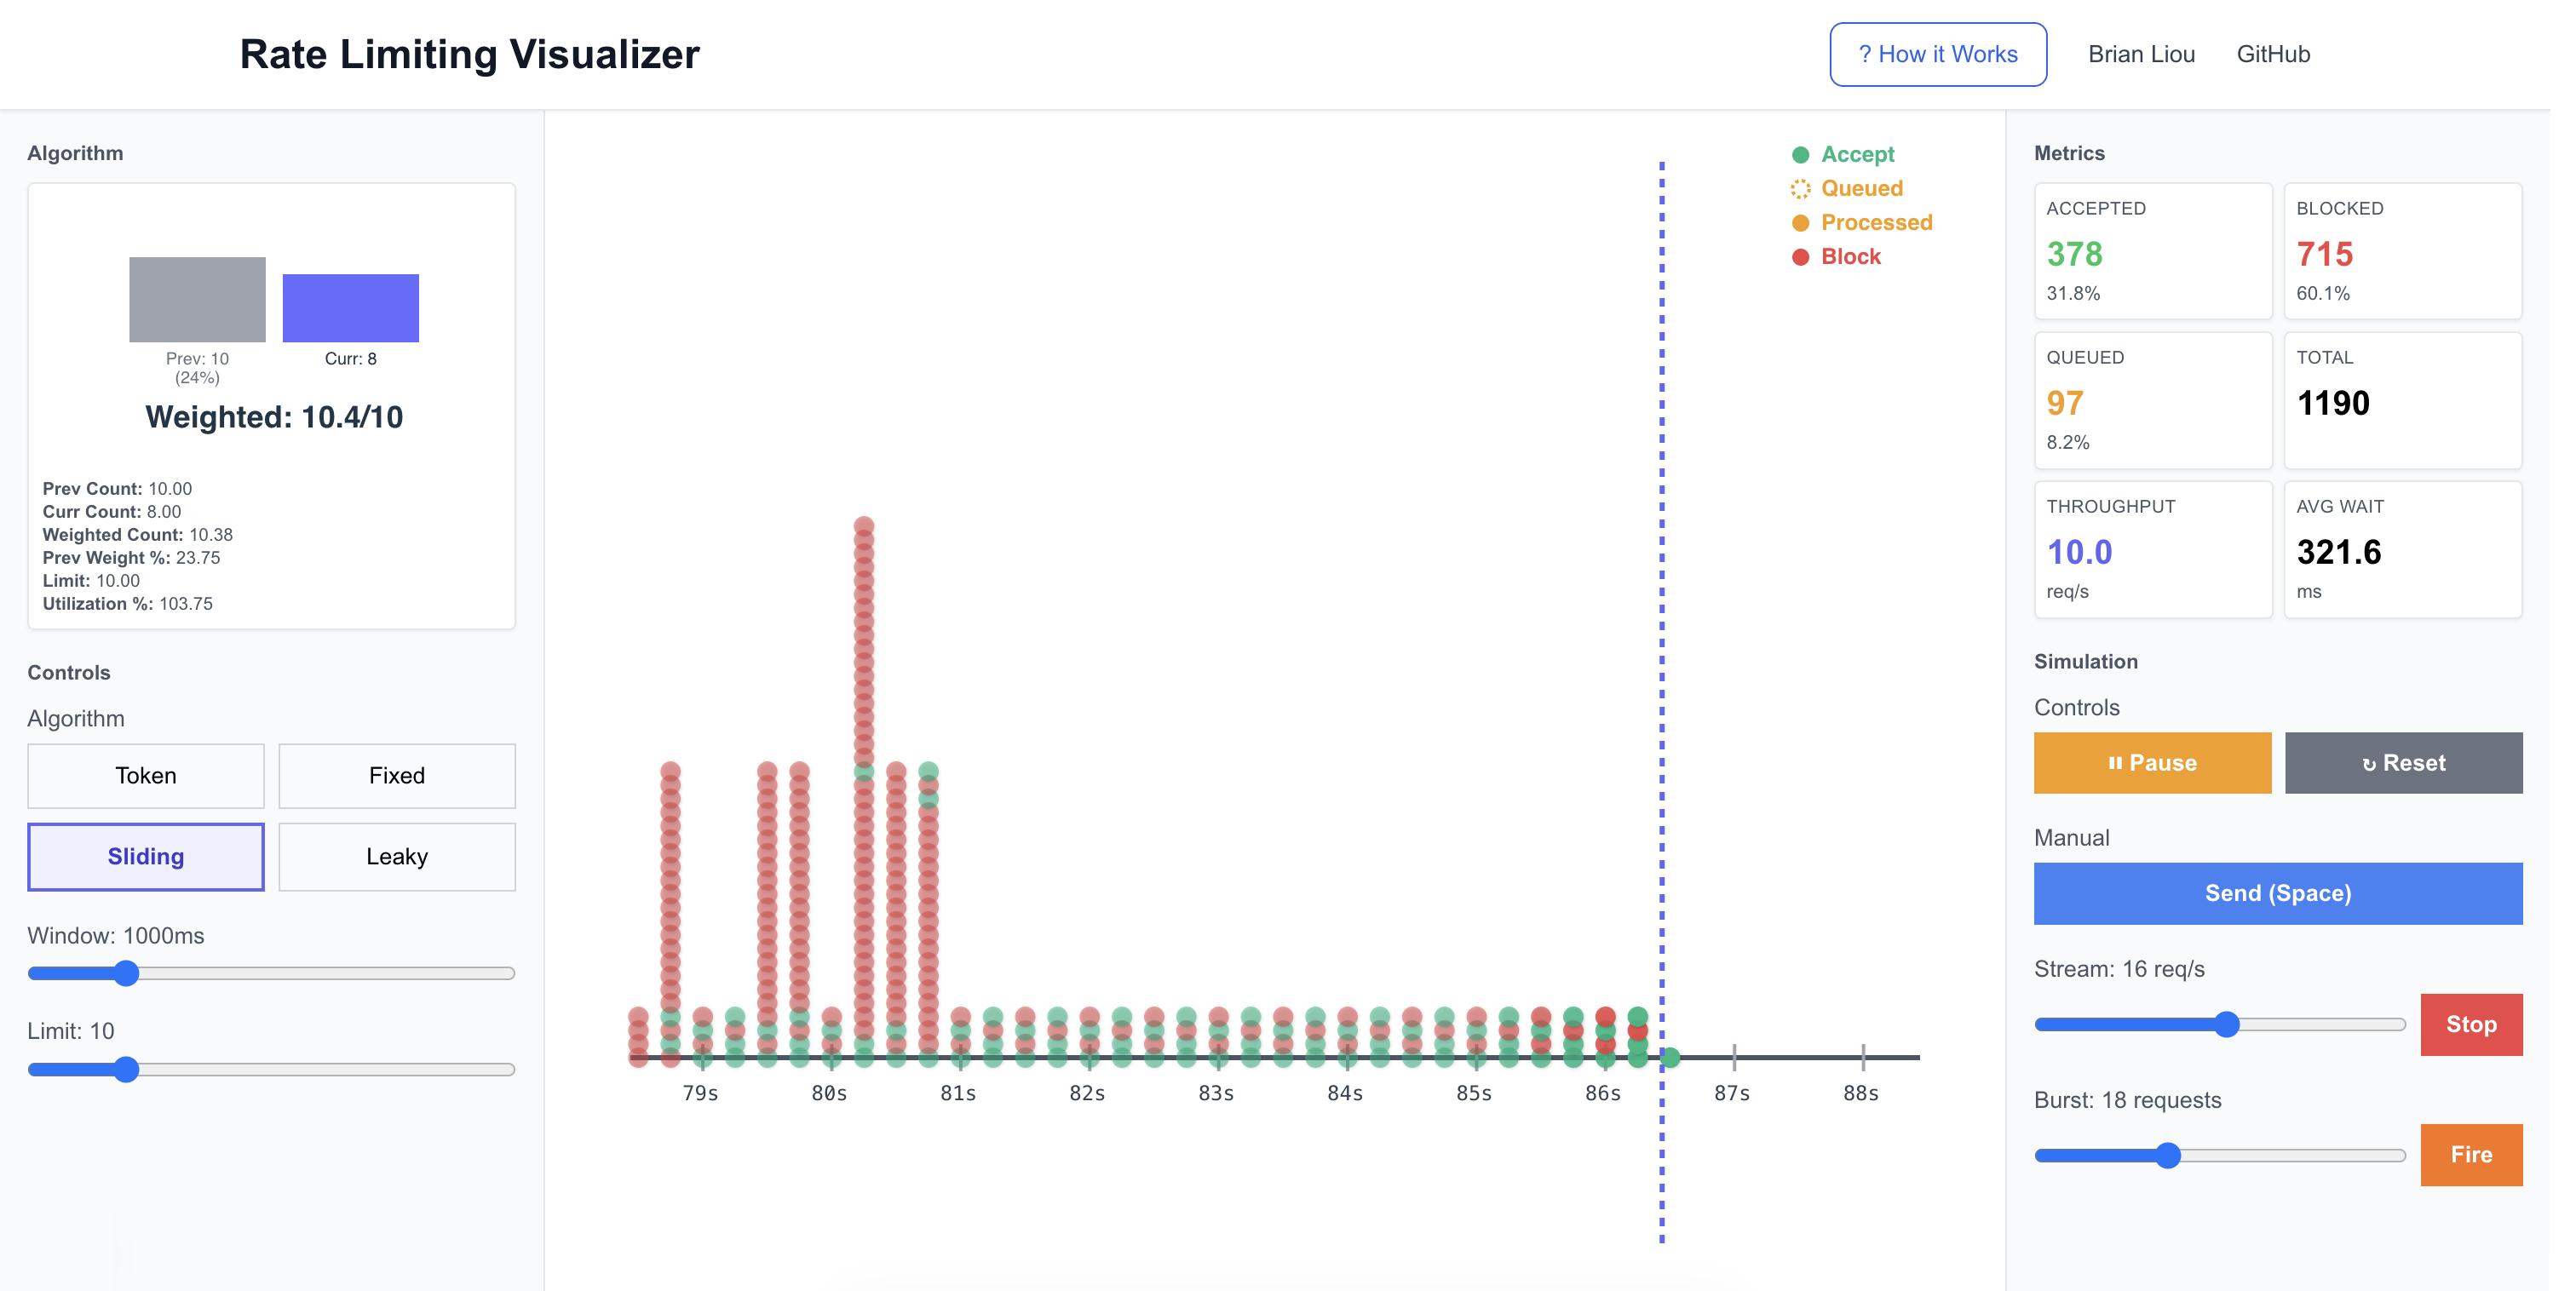 Sliding Window enforcing a 10 req/s limit: green = accepted, red = blocked
Why Rate Limiting Matters
Your API is humming along when suddenly: 10,000 requests per second from a single client with a broken retry loop. Do you block them all after the first burst? Queue them and process gradually? Accept some and block others?
The algorithm you choose determines whether your service stays up, your legitimate users stay happy, and your servers stay solvent. But rate limiting algorithms aren’t one-size-fits-all. Token Bucket is generous with bursts. Fixed Window has boundary problems. Sliding Window smooths traffic but adds complexity. Leaky Bucket queues everything.
Most production APIs use combinations of these. Stripe’s API uses token bucket for burst tolerance. GitHub uses fixed windows for basic rate limits and adds sliding windows for secondary limits. Cloudflare Workers implements leaky bucket for request queuing. Each choice reflects different priorities: user experience vs. strict fairness vs. implementation simplicity.
Reading about these tradeoffs is one thing. Seeing them is another. This project lets you experiment: send bursts, watch queues fill, observe how each algorithm reacts differently to the same traffic patterns.
How It Works
The visualizer simulates four common rate limiting algorithms, each with its own behavior and tradeoffs. While there are other approaches (like sliding window log, generic cell rate algorithm, or adaptive algorithms), these four represent the most widely-used patterns in production systems and cover the fundamental tradeoff space between simplicity, accuracy, and burst handling.
Token Bucket
Imagine a bucket that holds tokens. Tokens refill at a constant rate, and each request consumes one token. If you have tokens, the request goes through. If not, it’s blocked.
The key insight: The bucket acts as a burst buffer. If you’ve been quiet, tokens accumulate up to the capacity, allowing a sudden burst. But once depleted, you’re throttled to the refill rate.
decide(state: TokenBucketState, req: RequestEvt, nowMs: number): DecisionResult {
  // Refill tokens based on elapsed time
  const elapsed = (nowMs - state.lastRefillTs) / 1000;
  const newTokens = Math.min(
    state.capacity,
    state.tokens + elapsed * state.refillRate
  );

  // Can we afford this request?
  if (newTokens >= 1) {
    return { decision: 'accept', effectiveTs: nowMs };
  }
  return { decision: 'block' };
}
Use case: API rate limiting where you want to allow occasional bursts but enforce long-term limits.
Tradeoff: Generous to bursty traffic, but requires state per user/key.
Fixed Window
Divide time into fixed windows (e.g., every 1000ms). Count requests in the current window. If count < limit, accept. At the window boundary, reset to zero.
The problem: Boundary bursts. If your limit is 10 requests per second, someone could send 10 requests at t=999ms and another 10 at t=1001ms. That’s 20 requests in 2 milliseconds, all legal.
decide(state: FixedWindowState, req: RequestEvt, nowMs: number): DecisionResult {
  // Check if we've moved to a new window
  if (nowMs >= state.windowStart + state.windowMs) {
    state.windowStart = nowMs;
    state.count = 0;
  }

  // Within limit?
  if (state.count < state.limit) {
    state.count++;
    return { decision: 'accept', effectiveTs: nowMs };
  }
  return { decision: 'block' };
}
Use case: Simple quota systems where boundary bursts aren’t critical.
Tradeoff: Easiest to implement, but the boundary problem can allow 2× your intended limit.
Sliding Window
Fixed window’s smarter cousin. Instead of hard boundaries, it maintains both current and previous window counts, then calculates a weighted average based on how much of the previous window overlaps with your sliding window.
Math: For a request at time T with window size W:
- Your sliding window is [T-W, T]
- Calculate overlap with previous window
- Weight = overlap duration / W
- Decision based on: (weight × prevCount) + currCount < limit
decide(state: SlidingWindowState, req: RequestEvt, nowMs: number): DecisionResult {
  // Update windows if needed
  if (nowMs >= state.currWindowStart + state.windowMs) {
    state.prevWindowStart = state.currWindowStart;
    state.prevCount = state.currCount;
    state.currWindowStart += state.windowMs;
    state.currCount = 0;
  }

  // Calculate weighted count
  const elapsed = nowMs - state.currWindowStart;
  const prevWeight = (state.windowMs - elapsed) / state.windowMs;
  const weightedCount = prevWeight * state.prevCount + state.currCount;

  if (weightedCount < state.limit) {
    state.currCount++;
    return { decision: 'accept', effectiveTs: nowMs };
  }
  return { decision: 'block' };
}
Use case: When you need better smoothing than fixed window but don’t want queue complexity.
Tradeoff: Reduces boundary bursts significantly, slightly more complex than fixed window.
Leaky Bucket
A FIFO queue that drains at a constant rate. Requests arrive and enter the queue. A background process “drips” them out at the configured rate. If the queue is full, requests are blocked.
The key difference: This algorithm delays requests rather than just accepting/blocking. Accepted requests might wait in the queue before processing. This smooths traffic spikes into a steady output stream.
decide(state: LeakyBucketState, req: RequestEvt, nowMs: number): DecisionResult {
  // Queue has space?
  if (state.queue.length < state.queueCapacity) {
    state.queue.push({ id: req.id, enqueuedAt: nowMs });
    return {
      decision: 'queue',
      effectiveTs: nowMs  // Will be updated when drained
    };
  }
  return { decision: 'block' };
}

onTick(state: LeakyBucketState, nowMs: number) {
  const elapsedSec = (nowMs - state.lastDripTs) / 1000;
  const toDrain = Math.floor(elapsedSec * state.drainRate);

  for (let i = 0; i < toDrain && state.queue.length > 0; i++) {
    const drained = state.queue.shift()!;
    const effectiveTs = state.lastDripTs + (i * (1000 / state.drainRate));
    state.effectiveTimes[drained.id] = effectiveTs;
  }
}
Use case: Job queues, message processing. Anywhere you want smooth, predictable output rate.
Tradeoff: Introduces latency (queuing delay), requires queue storage.
Implementation
60 FPS Simulation
The visualizer runs a custom simulation clock at 60 FPS using requestAnimationFrame. This ensures smooth visuals and deterministic timing regardless of actual wall clock.
start() {
  const tick = (timestamp: number) => {
    const deltaMs = timestamp - this.lastTickTime;
    this.lastTickTime = timestamp;

    // Accumulate simulated time
    this.currentTime += deltaMs;

    // Notify all observers
    this.observers.forEach(fn => fn(this.currentTime));

    if (this.running) {
      this.rafId = requestAnimationFrame(tick);
    }
  };

  this.rafId = requestAnimationFrame(tick);
}
Why not just use setInterval? Because we wanted:
- Smooth 60 FPS animations
- Pause/resume without time jumps
- Potential for speed controls (future feature)
Request Generation with Accumulators
For steady streams (e.g., 5 requests/second), we can’t just generate one request every 200ms. Frame timing isn’t that precise. Instead, we accumulate fractional time and generate requests when the accumulator crosses the threshold.
tick(nowMs: number) {
  const deltaMs = nowMs - this.lastGenerateTime;
  this.accumulatedTime += deltaMs;

  const intervalMs = 1000 / this.requestsPerSecond;
  while (this.accumulatedTime >= intervalMs) {
    this.callback();
    this.accumulatedTime -= intervalMs;
  }

  this.lastGenerateTime = nowMs;
}
This ensures that over time, you get exactly the requested rate, even if individual frames vary.
State Management: Zustand + Immer
Managing rate limiter state, metrics, events, and UI requires careful coordination. Zustand provides a lightweight store, while Immer lets us write clean update logic:
processRequest: (req: RequestEvt) => {
  set((state) => {
    const result = state.algo?.decide(state.algoState, req, state.currentTime);

    const evt: DecisionEvt = {
      ...req,
      decision: result.decision,
      effectiveTs: result.effectiveTs
    };

    // Direct mutation syntax (Immer makes it immutable)
    state.events.push(evt);
    state.metrics.record(evt);
  });
}
No spread operators, no deep cloning. Just straightforward code that Immer transforms into efficient immutable updates.
Canvas Timeline Visualization
The timeline shows 10 seconds of history with color-coded request indicators. Events fade out as they age, creating a natural focus on recent activity.
Visual encoding:
- Green (solid) - Accepted immediately
- Orange (dotted) - Queued (arrival time)
- Orange (solid) - Processed from queue (effective time)
- Red (solid) - Blocked
For leaky bucket, queued requests show two dots: one dotted at arrival time, one solid at processing time. This visualizes the queue delay.
The canvas uses high DPI scaling for crisp rendering on retina displays:
const dpr = window.devicePixelRatio || 1;
canvas.width = dimensions.width * dpr;
canvas.height = dimensions.height * dpr;
canvas.style.width = `${dimensions.width}px`;
canvas.style.height = `${dimensions.height}px`;
ctx.scale(dpr, dpr);
Polymorphic Algorithm Interface
Each algorithm implements a common interface, making them interchangeable:
interface Algo<TState> {
  init(params: AlgoParams, nowMs: number): TState;
  decide(state: TState, req: RequestEvt, nowMs: number): DecisionResult;
  onTick(state: TState, nowMs: number): void;  // For draining, refills, etc.
  snapshot(state: TState, nowMs: number): Record<string, number>;
}
The store doesn’t care which algorithm is active. It just calls the interface methods. Adding a new algorithm is as simple as implementing this interface.
What I Learned
The State Space Explosion of Pause/Resume
Getting pause/resume right took 4-5 iterations because the state space was larger than I initially realized. The requirements seemed simple:
- Pausing the simulation should pause request streams
- Resuming should restart streams that were running
- Stopping a stream manually should prevent auto-resume
- UI must always reflect actual state
But this is actually 3 states × 2 controls × multiple transitions ≈ 18 scenarios. Is the stream running? Was it paused by the user or the simulation? Should it resume when simulation starts?
The solution: a three-state system (running, paused, stopped) instead of just on/off, plus a version counter to force React re-renders:
// In the generator
private running: boolean = false;
private paused: boolean = false;   // Was running, will resume

pause() {
  this.running = false;
  this.paused = true;  // Remember we should resume
}

stop() {
  this.running = false;
  this.paused = false;  // Don't resume
}
The lesson: seemingly simple features often hide complex state interactions. Map out the full state space before implementing, or you’ll discover it through debugging.
Visualization Drives Understanding
Building this tool changed how I think about rate limiting. Reading that “Fixed Window has a boundary problem” is abstract. Watching 20 requests cluster at t=999ms and t=1001ms, all accepted, makes it concrete.
The act of building the visualization forced me to understand these algorithms at a deeper level. You can’t fake it when you have to implement the actual logic and show it working in real-time. If your mental model is wrong, the visualization will expose it immediately.
Try It Out
The best way to see these differences? Run the experiments below. Each one takes about 30 seconds and will make the tradeoffs immediately obvious.
Open the visualizer and experiment:
- Start with Token Bucket (capacity: 10, refill: 5/s)
- Send a burst of 20 requests
- Watch the first 10 get accepted (consuming tokens), then the next 10 blocked
- Wait a few seconds and try another burst. Tokens have refilled
Then switch to Fixed Window and try the boundary burst:
- Set window to 1000ms, limit to 10
- Enable steady stream at 15 req/s
- Watch requests cluster near window boundaries. Some windows get 10+ requests
Now compare with Sliding Window using the same parameters:
- Keep window at 1000ms, limit to 10
- Use the same steady stream at 15 req/s
- Notice how the weighted averaging smooths out the boundary bursts
- Switch back and forth between Fixed and Sliding to see the difference
Finally, try Leaky Bucket with queueing:
- Set drain rate to 3/s, queue capacity to 10
- Send a burst of 20
- Watch the timeline: dotted circles (queued), then solid circles as they drain
- Notice the smooth 3/s output rate despite bursty input
Rate limiting is all about understanding the tradeoffs and choosing the right tool for your constraints. Token Bucket if you need burst tolerance. Fixed Window if you want simplicity. Sliding Window if boundary bursts matter. Leaky Bucket if you need smooth output.
The best way to internalize these differences is to play with them, break them, and see how they behave under stress. That’s what this visualizer is for.